Canvas tour
The Agent Builder is a full-screen visual editor where you design your Task Agent’s workflow. After creating an agent, you land here automatically. You can also reach it from the Agents list by clicking on any agent.
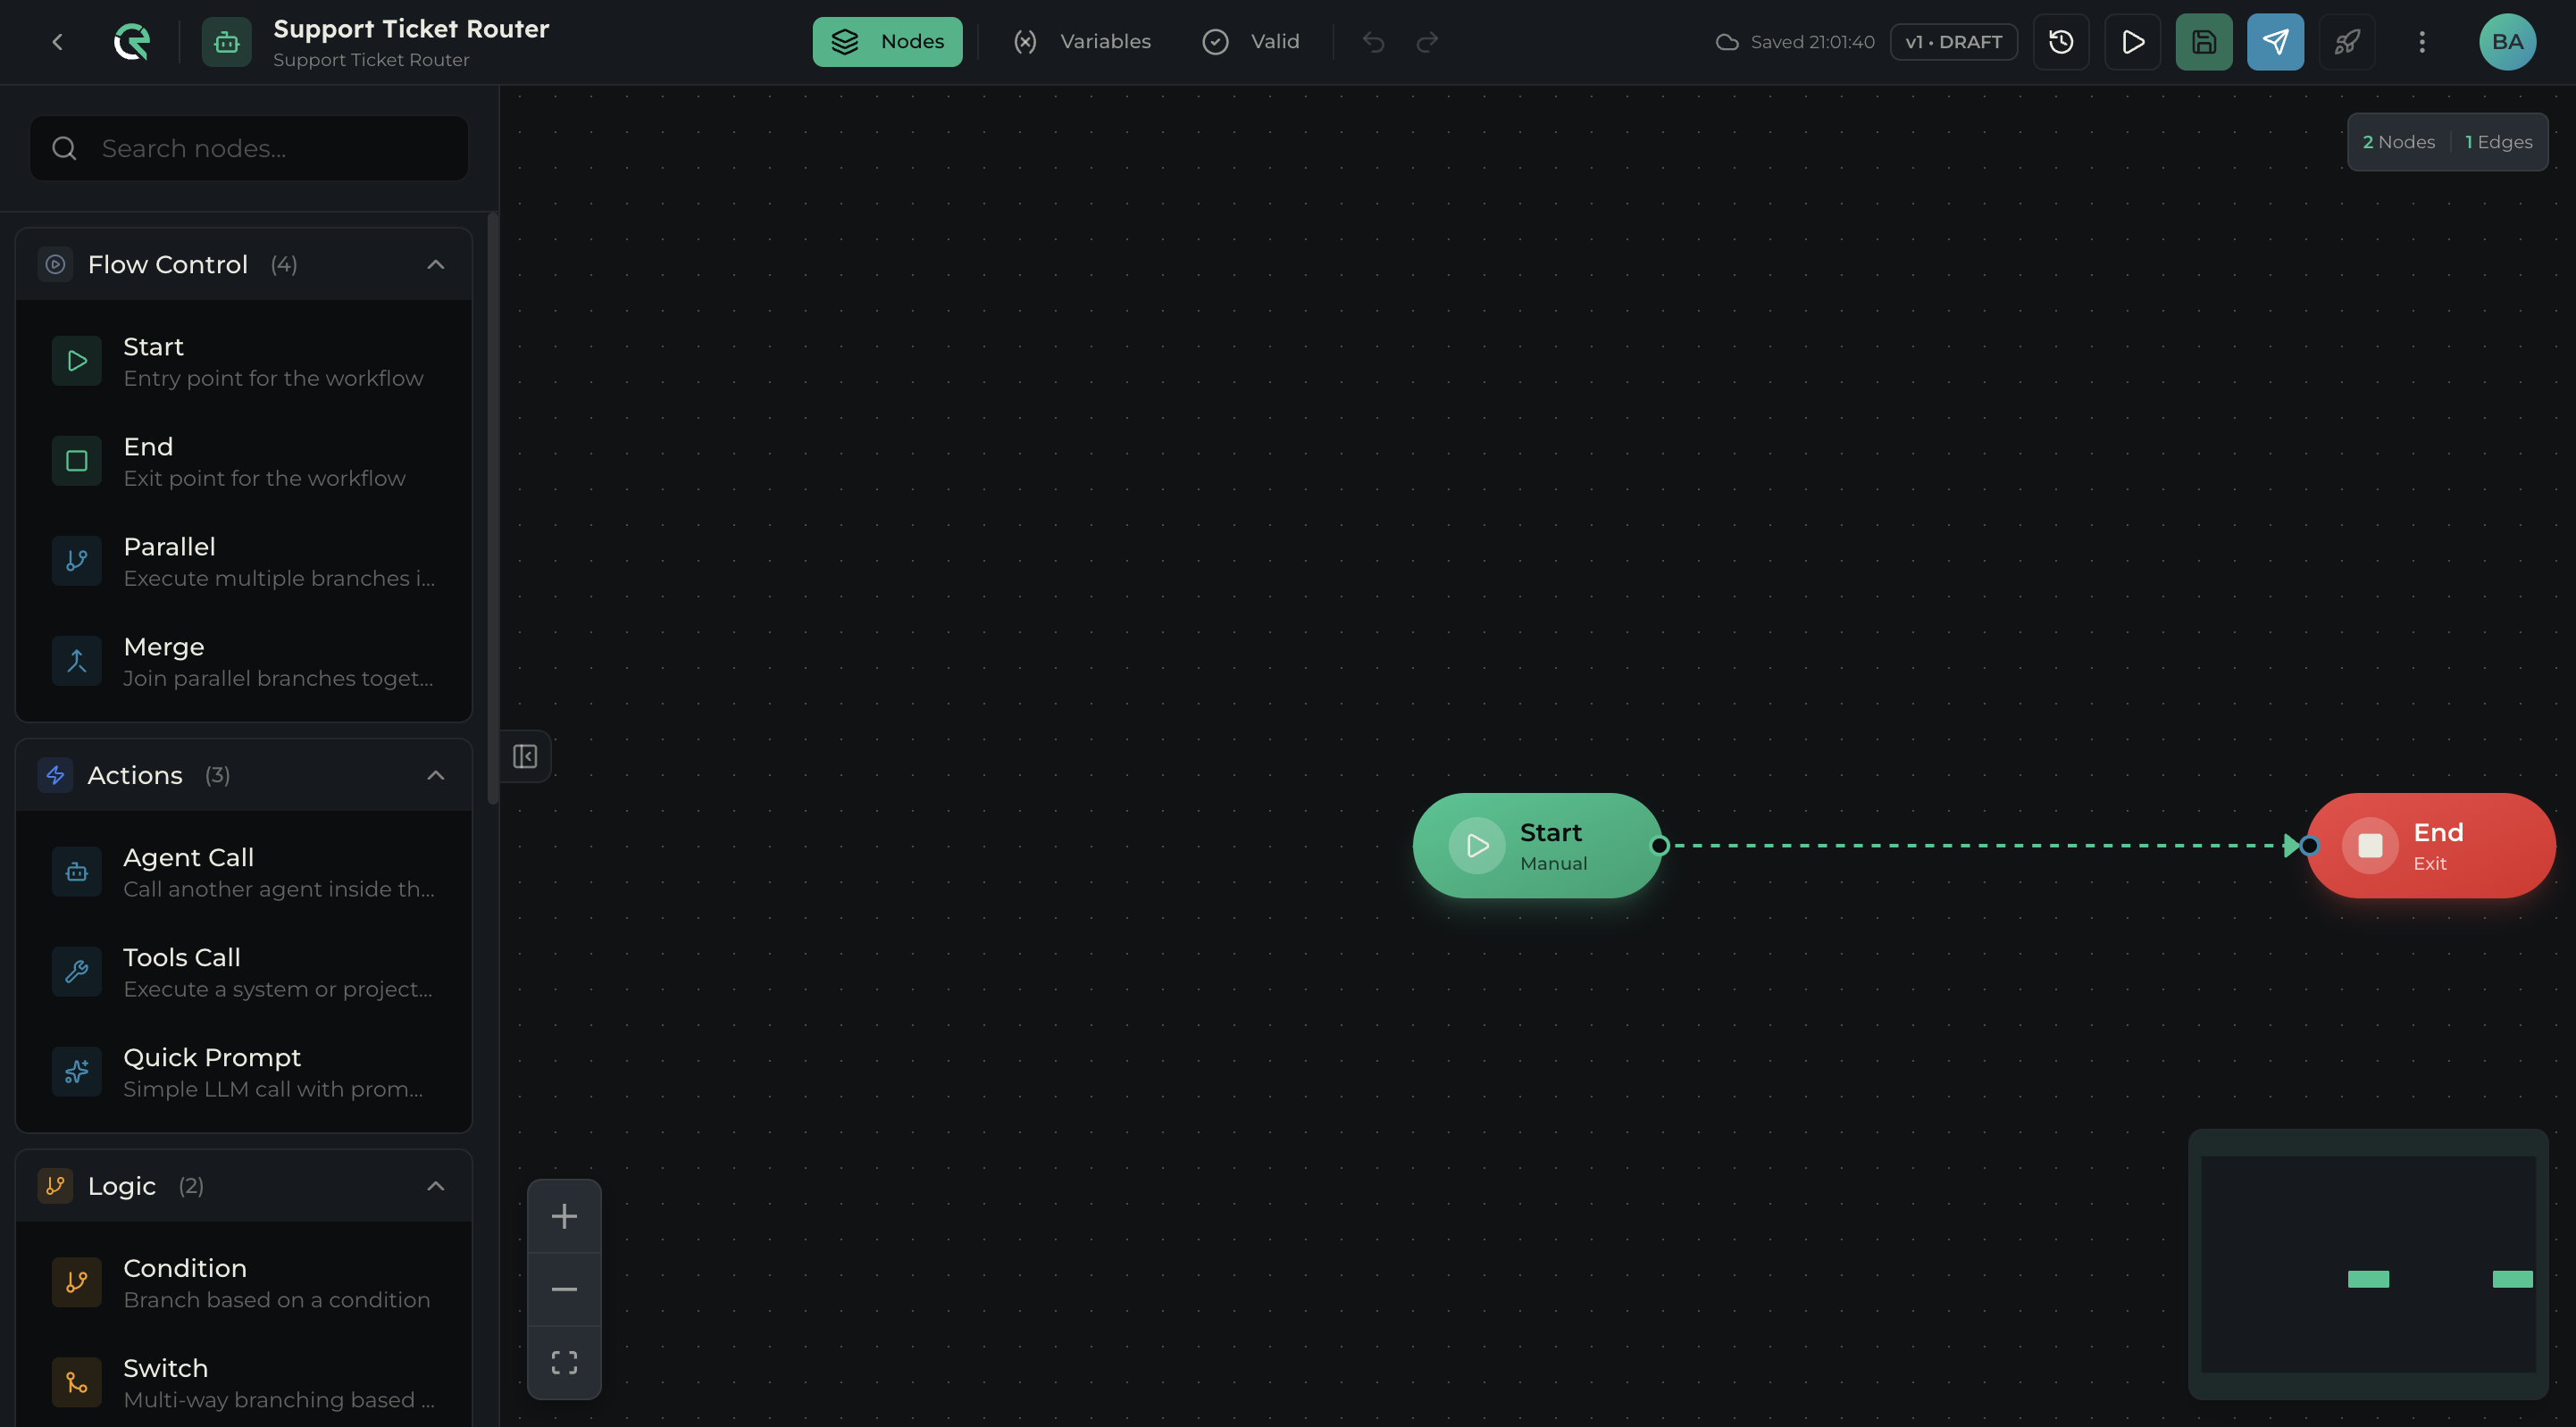
Layout
The Builder has three main areas:
| Area | Position | Purpose |
|---|---|---|
| Header toolbar | Top bar | Navigation, panel toggles, undo/redo, version & publish controls |
| Node Palette | Left panel | Browse and drag nodes onto the canvas |
| Graph Canvas | Center | Visual editor where you place nodes and connect them with edges |
Additional panels open on demand:
- Variables panel — Right side, shows all available variables
- Node configuration — Overlay panel when configuring a node
Header toolbar
The top bar is divided into three sections:
Left section
- Go Back — Returns to the Agents list.
- Home logo — Returns to the dashboard.
- Agent name — Shows the agent icon, name heading, and subtitle.
Center section
- Nodes — Toggles the left Node Palette on/off.
- Variables — Opens the Variables panel on the right.
- Valid — Validation status indicator. Shows “Valid” with a green icon when the graph has no errors.
- Undo (⌘Z) / Redo (⌘⇧Z) — Step through edit history.
Right section
- Save status — Shows “Unsaved changes” or “Saved” with timestamp.
- Version label — e.g., “v1 • DRAFT”.
- Versions — Opens the version history panel (shows count like “Versions (1)”).
- Test — Opens the test runner to execute the agent.
- Save — Saves the current graph.
- Publish — Promotes the draft to a published version.
- Deploy — Deploys a published version (disabled until you publish first).
- User avatar — Your account.

Node Palette (left panel)
The Node Palette is a searchable list of all available node types, grouped by category. Toggle it with the Nodes button in the toolbar.
To add a node, drag it from the palette and drop it onto the canvas.
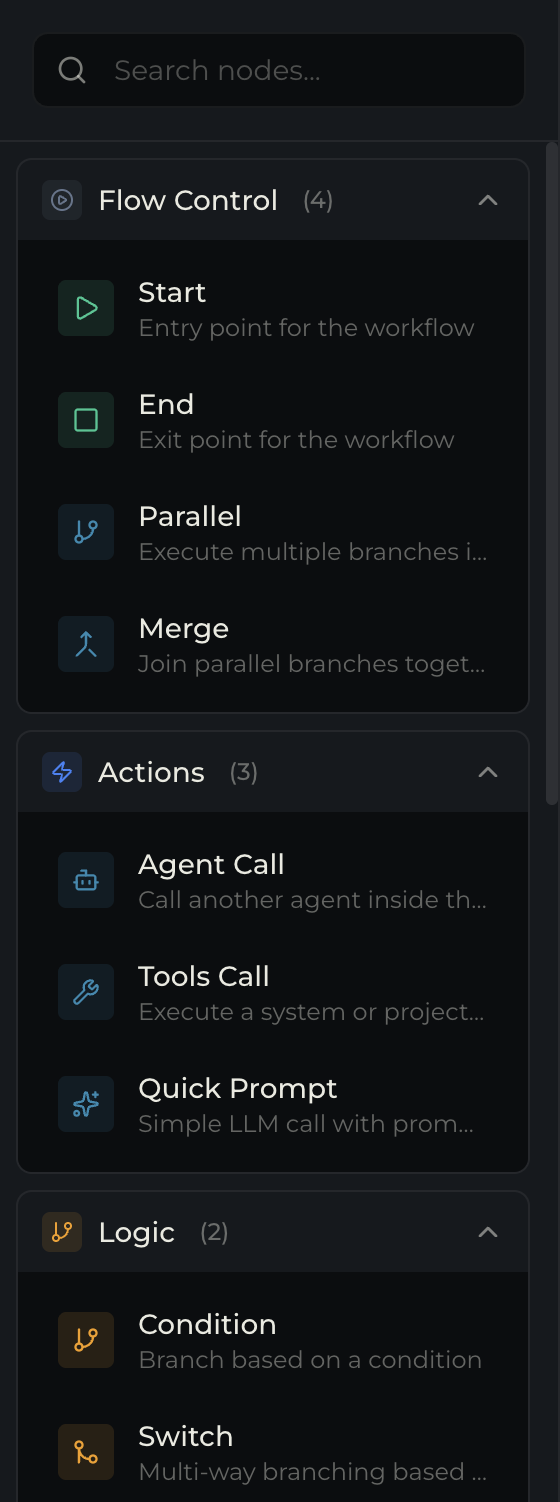
Categories and nodes
| Category | Count | Nodes |
|---|---|---|
| Flow Control | 4 | Start, End, Parallel, Merge |
| Actions | 3 | Agent Call, Tools Call, Quick Prompt |
| Logic | 2 | Condition, Switch |
| Loops | 1 | Loop |
| Data | 4 | Query Table, Insert Row, Update Row, Delete Row |
| RAG | 2 | Search Content Store, Reindex Content Store |
| Advanced | 1 | Code |
Each node shows its name and a brief description (e.g., “Query Table — Query data from database tables with filters and sorting”).
Each category header is collapsible — click the chevron to expand or collapse.
Use the Search nodes… bar at the top of the palette to filter by name or description. Type “table” to quickly find all Data nodes.
Graph Canvas (center)
The canvas is a visual graph editor powered by React Flow. Nodes appear as cards with icons, and edges connect them as curved lines with arrows.
Default state
Every new Task Agent starts with:
- Start node (labeled “Manual”) — the entry point
- End node (labeled “Exit”) — the exit point
- One edge connecting Start → End
Interactions
| Action | How |
|---|---|
| Add a node | Drag from the Node Palette and drop onto the canvas |
| Connect nodes | Drag from a node’s output handle (right side) to another node’s input handle (left side) |
| Select a node | Click it — shows a gear icon and makes the name editable |
| Configure a node | Click the gear icon (Configure node) that appears when selected |
| Rename a node | Click the node name text (shows “Click to rename” tooltip) |
| Move a node | Drag it to a new position |
| Delete a node | Select it and press Delete / Backspace |
| Delete an edge | Click the edge — a delete button appears |
| Pan | Click and drag on empty canvas space |
| Zoom | Scroll wheel, pinch on trackpad, or use the zoom controls |
Canvas controls (bottom-right)
- Zoom in / Zoom out buttons
- Fit view — Resets zoom to show all nodes
- Minimap — A small overview of the entire graph for orientation
Status bar (bottom)
Shows the current graph metrics: Node count and Edge count (e.g., “2 Nodes • 1 Edges”).
Node configuration
When you click a node and then click its gear icon (Configure node), a configuration panel opens as an overlay. Each node type has its own settings form.
Start node configuration
The Start node panel shows:
- Title: “Start Node” — “Configure workflow entry point”
- Input Variables — Define variables that the workflow accepts as input. Click Add Variable to create one. These become available to all downstream nodes.
- Initiation Form — Toggle on/off. When enabled, a confirmation form is shown before this Task Agent runs from an AI Agent.
- Cancel / Save buttons at the bottom.
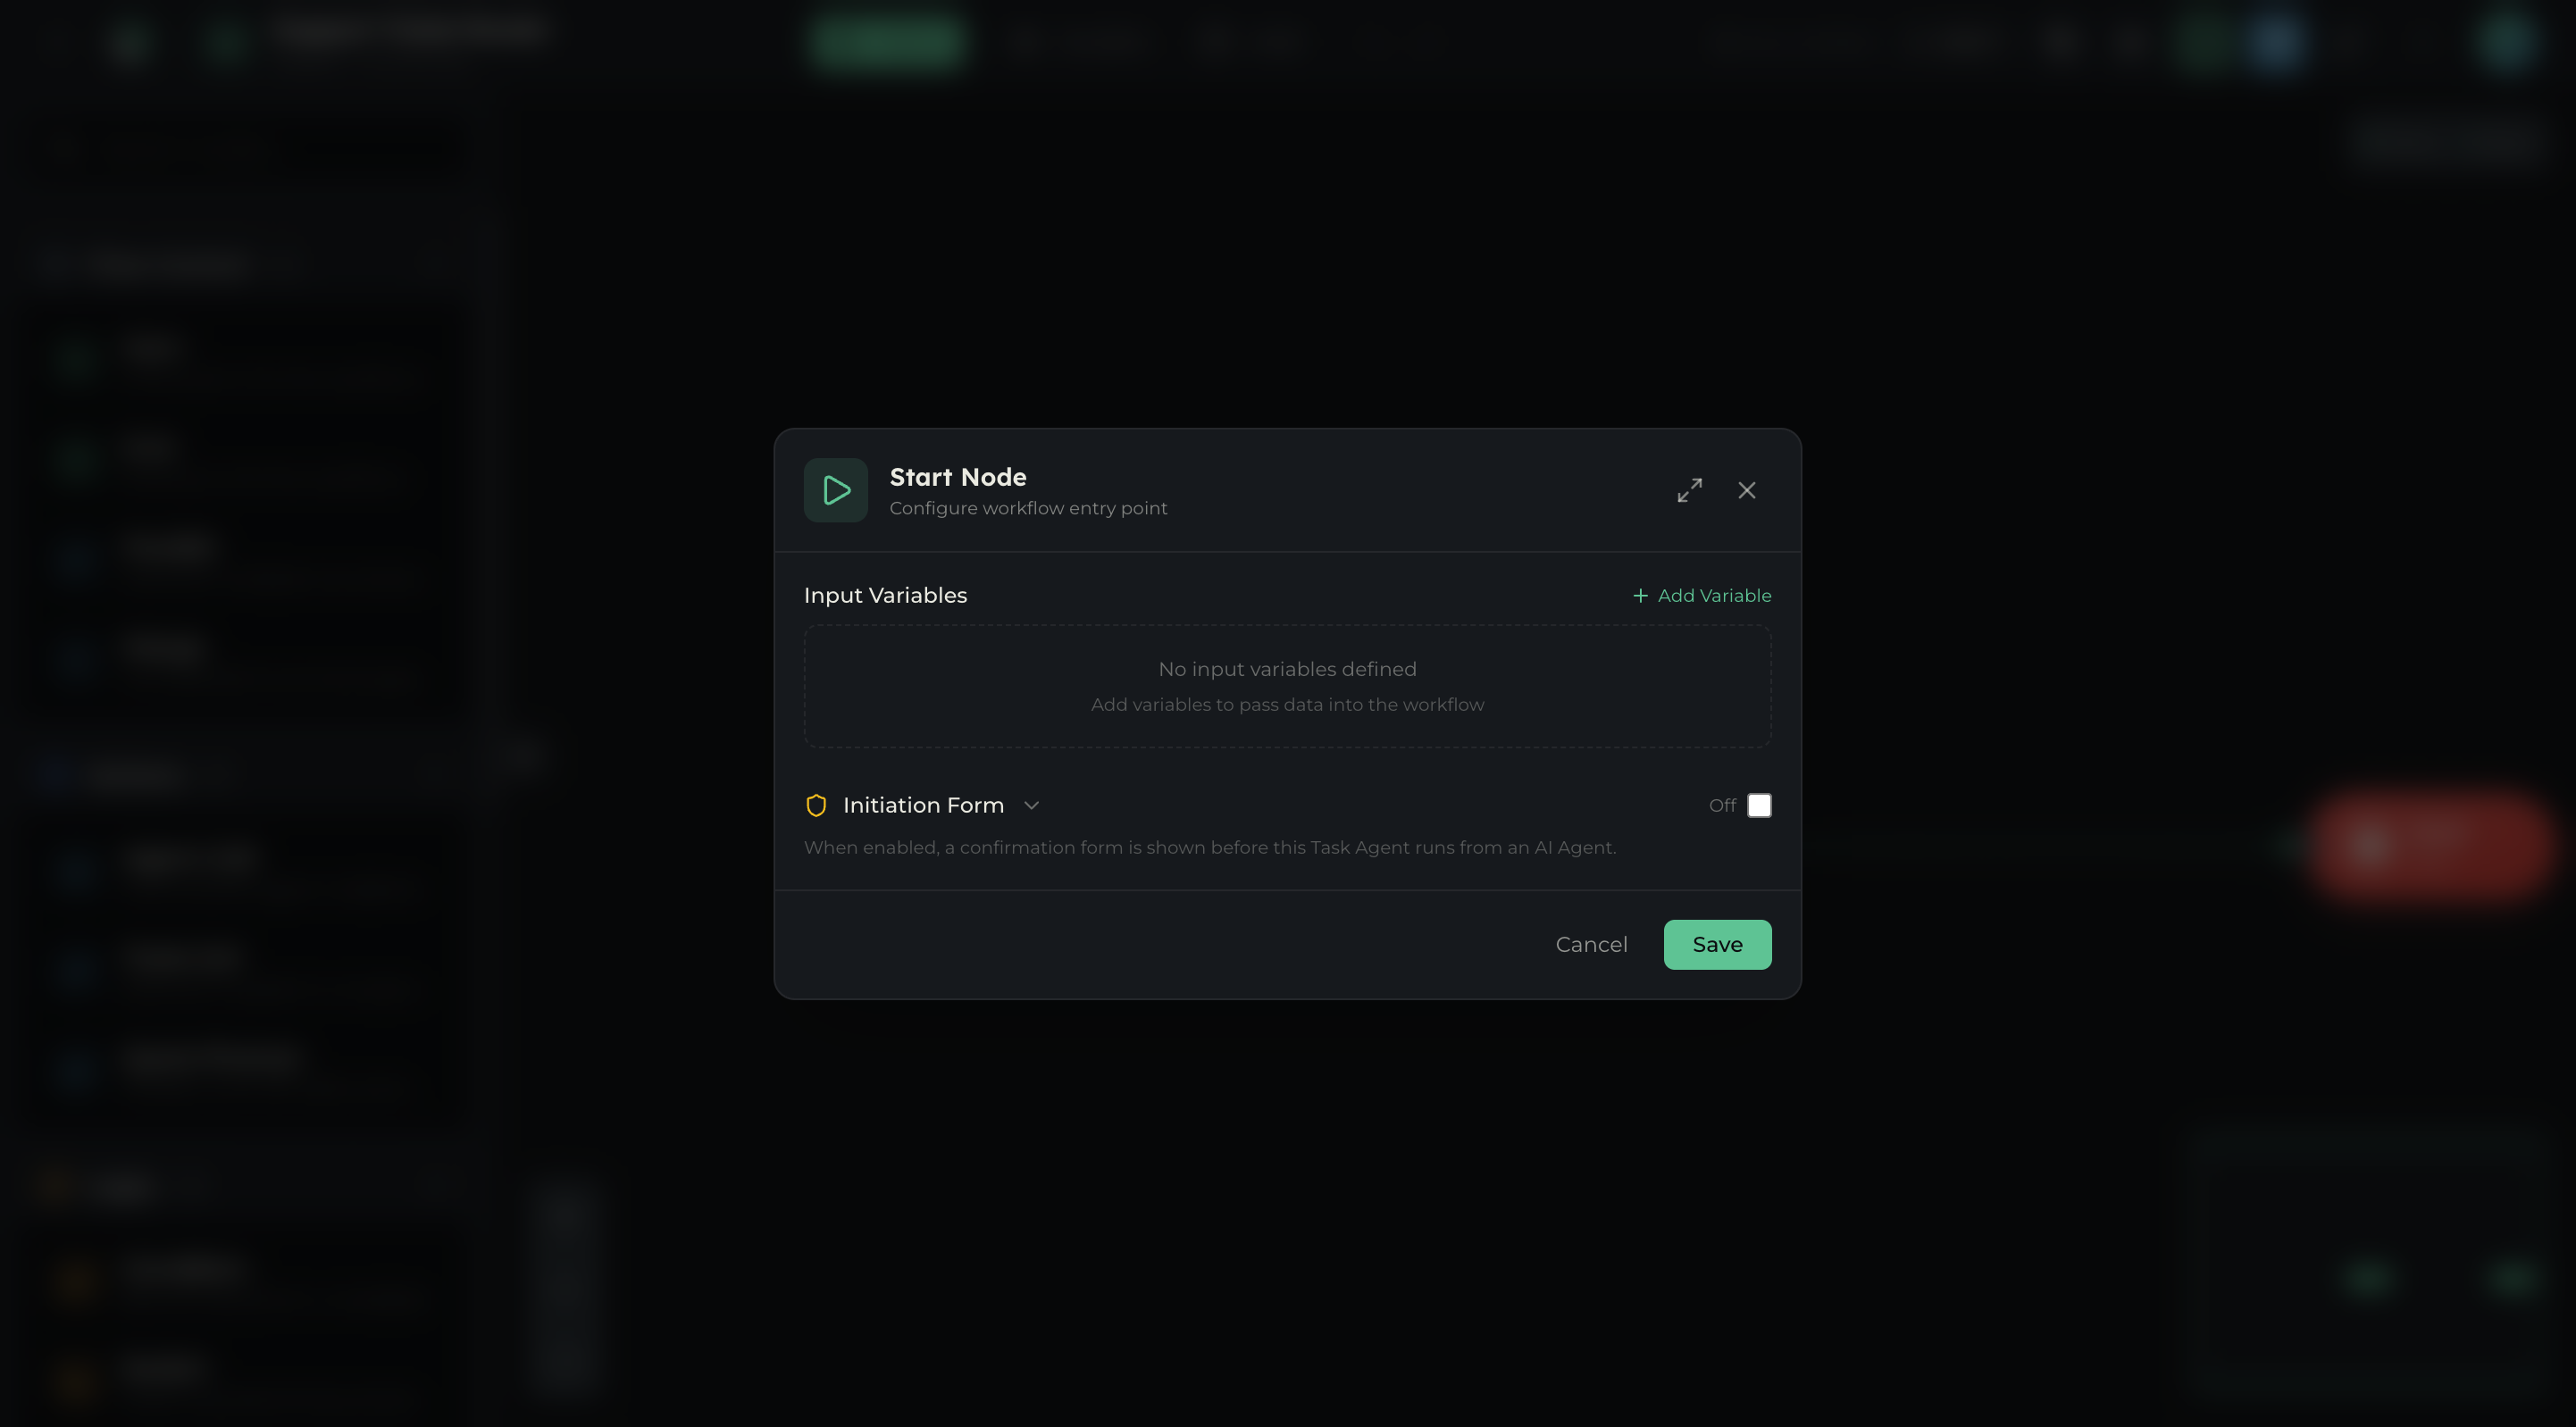
Input Variables defined on the Start node are how you pass data into the workflow from external callers (API, other agents, webhooks).
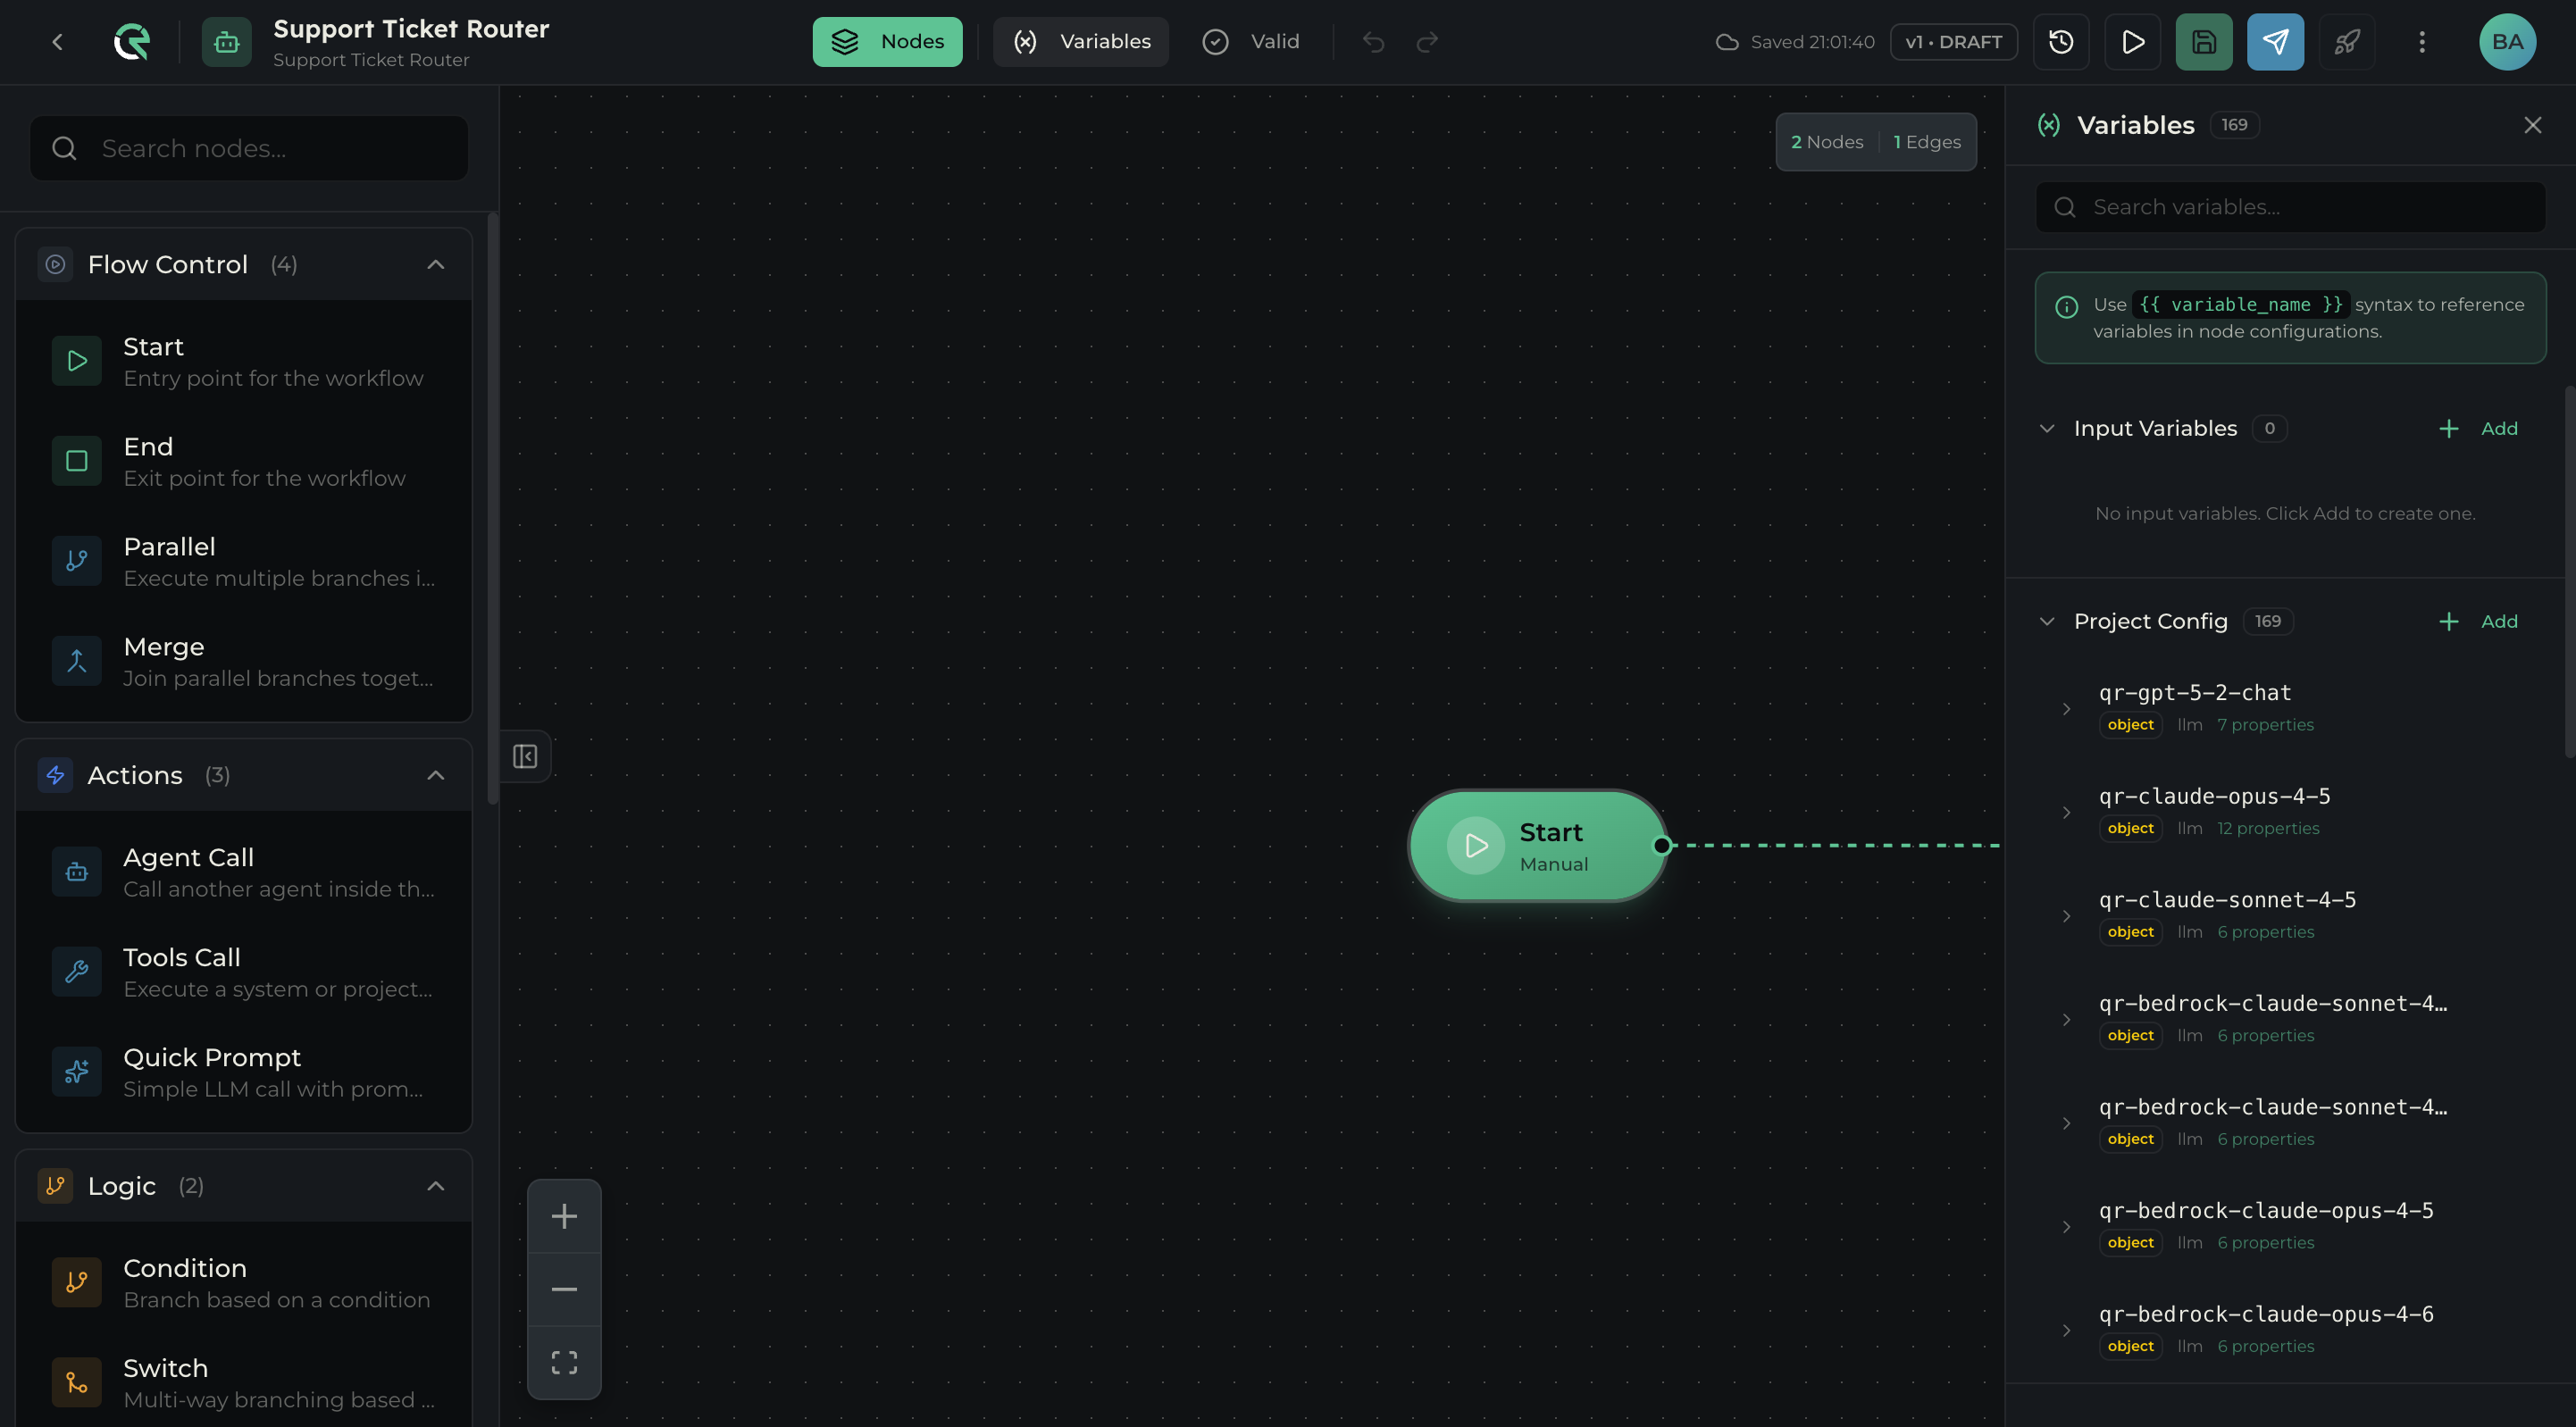
Variables panel (right panel)
Click Variables in the toolbar to open this panel. It shows:
- Total variable count (e.g., “169”)
- Search — Filter variables by name
- Usage hint — “Use
{{ variable_name }}syntax to reference variables in node configurations” - Input Variables — Variables defined on the Start node (with Add button)
- Project Config — All project-level configuration variables (LLM models, integrations, etc.)
Each variable displays its name, type, category, and property count. Click Copy reference to copy the {{ }} syntax.
Versions and saving
Your agent starts as v1 • DRAFT. Changes are auto-saved or saved manually with the Save button.
The workflow:
- Edit — Make changes on the canvas (DRAFT state).
- Save — Persist changes to the current draft.
- Publish — Freeze the draft into an immutable published version.
- Deploy — Make a published version live for production traffic.
Click Versions in the toolbar to see all versions and their states.
See Versioning & promotion for the full lifecycle.
Common issues
- Can’t drop nodes — Make sure you’re dragging from the palette (not clicking). The cursor should show a grab icon.
- Edges won’t connect — Drag from an output handle (right side, small circle) to an input handle (left side). Not all nodes accept multiple inputs.
- Node palette hidden — Click the Nodes button in the toolbar to toggle it back on.
- “Unsaved changes” won’t clear — Click Save or wait for auto-save. If it persists, check your network connection.